Post by snaffle on Jun 24, 2009 16:05:38 GMT -5
I had spent approximately 5 to 6 weeks of my 'free time' in 1997 working on this 10 yr old trailer.
All the trim and lights were removed. Anything that I didnt want painted, such as window trim was covered with tape.
I sanded by hand, (using a wire brush on my electric drill and also an electric sander) primed, trimmed, painted, undercoated and just about lost what little sanity I had.
I opted NOT to use a sand blaster because of the toxic properties in the sand that it used. I was told that if I sandblasted it, I would immediately have to apply the ospho, and I wasnt completely sure if I would be able to work out my time and do it like that.
I spent somewhere between $225 and $250 on products. The trailer is actually in better condition that when it came from the factory. The floor is better and the paint is better. It was not originally undercoated, but it is now.
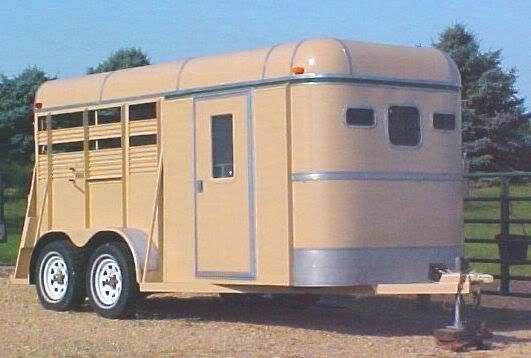
The outer color is Rustoleum Sand, the inside of the dressing room is Rustoleum Almond. I wanted to add as much brightness inside the dressing room as possible. After a lot of questions and research from others who had painted eqiupment, I opted to only use the Rustoleum products.
I had thought about painting the trailer white , because it would look nicer and be cooler in the summer, but a friend who had painted her steel trailer white, convinced me not to. Any area that will chip off the paint. (hinges etc) will show up rusty, and those areas would show up easier on a white trailer
I used OSPHO after sanding as the rust preventative of choice. When I bought the OSPHO I found a spray top that fit the bottle, and would spray rather than brush it on. worked much easier. The Ospho was highly recommended on the Do-it-yourself yahoo list. I found it as ACE hardware.
I only had a few small areas that had rusted through and that was the bottom of the wall ... between the dressing room and the horse area. I used a silicone caulk to fill in the area. Those areas were less than 1/2 inch high and I didnt feel it affected the safety of the trailer.
I tried to spray the OSPHO in any corner openings. Now I wish I had used caulk also in those itty bitty areas because that is where any rust is now washing out.
I used a foam roller to apply the primer and paint. It covered many imperfections. I used spray on Rustoleum to do any edgings or corners. That alone saved me a lot of time and frustration.
I used 1 1/2 to 2 gallons of primer, plus a few spray cans of primer. I did NOT prime the inside except where there was rust showing. I used about 3 gallons of regular paint. Lost count on the spray paint cans. Possibly 10. Using the spray primer and spray paint in the corners or tight areas makes the job much easier.
I may have spent 30 to 40 hours on it. I never worked on it more than 4 hours at a time because it just about drove me over the edge. edge of what.. I dont know.
Would I do it again? Ask me again in about 150 years.
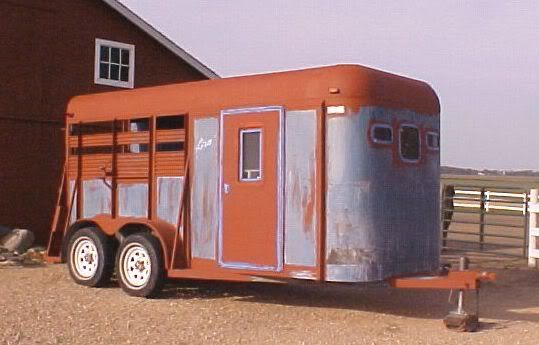
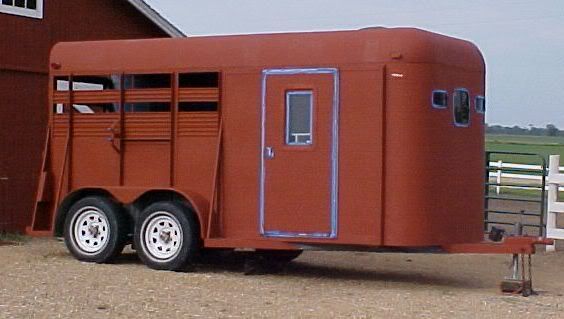
The before picture was taken after the trim was removed. In the finished picture, there is a hunter green stripe across the top of the trailer where we forgot to replace an aluminum strip.
I am guessing that if we hired the complete job done, it would have costs us between $1500 and $2,000
The trailer sat out in front of my barn the entire time. We didn’t have a place with a tall enough doorway to get it inside. It was a rather drier year (1997). I remember there was rain, but I don’t remember how much.
I only wire brushed, what I knew I could ospho the same day. And if I could prime it the same day that was even better.
I had to work in sections so I didnt loose all my marbles.
The cost of all my supplies (including wire brushes and paint rollers) was between $225 and $250.
After a gelding pawed at the new paint job, I took a can of black undercoating, and sprayed the bottom half of the inside wall. It has worked wonderfully, and has not chipped or knicked if another horse decided to kick or paw.
I had to work on mine outside for lack of a large building. I planned my work so it was not raining when I sanded. Once it was primed I didn’t worry too much about it.
completely sanded:

partially primed:

completely primed:

Finished:

All the trim and lights were removed. Anything that I didnt want painted, such as window trim was covered with tape.
I sanded by hand, (using a wire brush on my electric drill and also an electric sander) primed, trimmed, painted, undercoated and just about lost what little sanity I had.
I opted NOT to use a sand blaster because of the toxic properties in the sand that it used. I was told that if I sandblasted it, I would immediately have to apply the ospho, and I wasnt completely sure if I would be able to work out my time and do it like that.
I spent somewhere between $225 and $250 on products. The trailer is actually in better condition that when it came from the factory. The floor is better and the paint is better. It was not originally undercoated, but it is now.
The outer color is Rustoleum Sand, the inside of the dressing room is Rustoleum Almond. I wanted to add as much brightness inside the dressing room as possible. After a lot of questions and research from others who had painted eqiupment, I opted to only use the Rustoleum products.
I had thought about painting the trailer white , because it would look nicer and be cooler in the summer, but a friend who had painted her steel trailer white, convinced me not to. Any area that will chip off the paint. (hinges etc) will show up rusty, and those areas would show up easier on a white trailer
I used OSPHO after sanding as the rust preventative of choice. When I bought the OSPHO I found a spray top that fit the bottle, and would spray rather than brush it on. worked much easier. The Ospho was highly recommended on the Do-it-yourself yahoo list. I found it as ACE hardware.
I only had a few small areas that had rusted through and that was the bottom of the wall ... between the dressing room and the horse area. I used a silicone caulk to fill in the area. Those areas were less than 1/2 inch high and I didnt feel it affected the safety of the trailer.
I tried to spray the OSPHO in any corner openings. Now I wish I had used caulk also in those itty bitty areas because that is where any rust is now washing out.
I used a foam roller to apply the primer and paint. It covered many imperfections. I used spray on Rustoleum to do any edgings or corners. That alone saved me a lot of time and frustration.
I used 1 1/2 to 2 gallons of primer, plus a few spray cans of primer. I did NOT prime the inside except where there was rust showing. I used about 3 gallons of regular paint. Lost count on the spray paint cans. Possibly 10. Using the spray primer and spray paint in the corners or tight areas makes the job much easier.
I may have spent 30 to 40 hours on it. I never worked on it more than 4 hours at a time because it just about drove me over the edge. edge of what.. I dont know.
Would I do it again? Ask me again in about 150 years.
The before picture was taken after the trim was removed. In the finished picture, there is a hunter green stripe across the top of the trailer where we forgot to replace an aluminum strip.
I am guessing that if we hired the complete job done, it would have costs us between $1500 and $2,000
The trailer sat out in front of my barn the entire time. We didn’t have a place with a tall enough doorway to get it inside. It was a rather drier year (1997). I remember there was rain, but I don’t remember how much.
I only wire brushed, what I knew I could ospho the same day. And if I could prime it the same day that was even better.
I had to work in sections so I didnt loose all my marbles.
The cost of all my supplies (including wire brushes and paint rollers) was between $225 and $250.
After a gelding pawed at the new paint job, I took a can of black undercoating, and sprayed the bottom half of the inside wall. It has worked wonderfully, and has not chipped or knicked if another horse decided to kick or paw.
I had to work on mine outside for lack of a large building. I planned my work so it was not raining when I sanded. Once it was primed I didn’t worry too much about it.
completely sanded:

partially primed:

completely primed:

Finished:


